Tagged: editor, game, gaming, level, maker, open-source, side-scroller, supertux
This topic was published by Jarret Buse and viewed 2069 times since "". The last page revision was "".
- AuthorPosts
Many people have played many games and thought at times, "This section would be better if...". Well, if you have played SuperTux 2, now is your chance to make this a reality. With the SuperTux 2 Level Editor, you can create your own levels.
To start, you need SuperTux 2. After the game is installed, you can then add the Level Editor. The easiest may be to follow these steps by adding a repository:
- sudo add-apt-repository ppa:supertux-dev/daily
- sudo apt-get update
- sudo apt-get install supertux-editor-git
Before starting the editor, you will need full access to two folders. By default, the folders are /usr/share/games/supertux-editor and /usr/share/games/supertux2. You can go to the the specified folders in a terminal and use the command
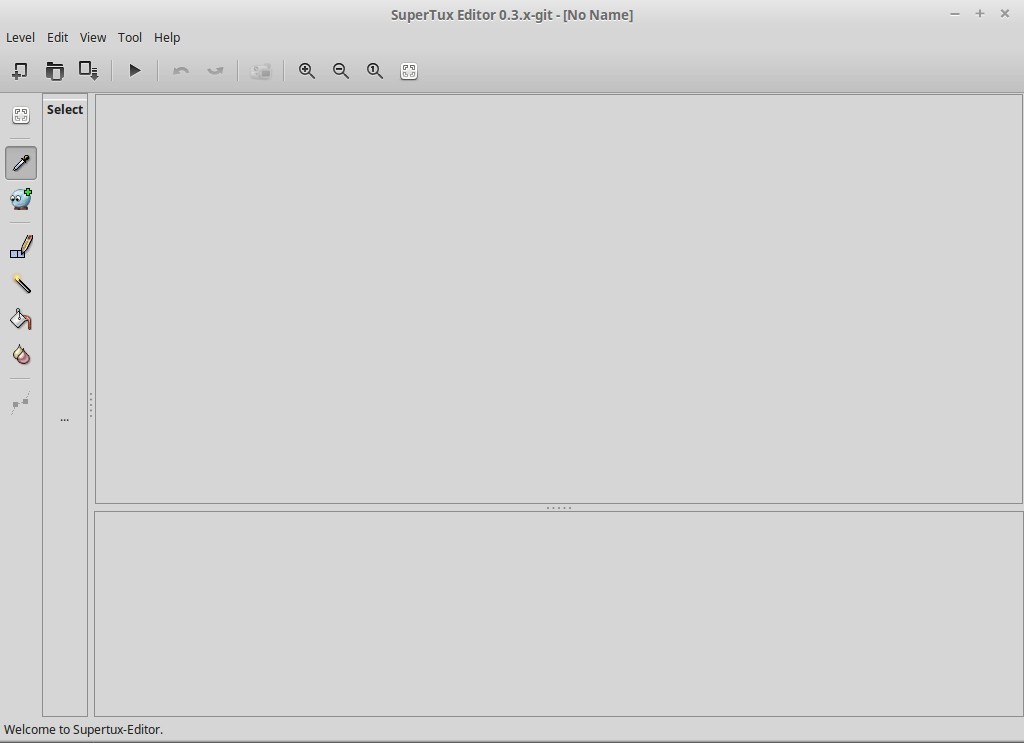
sudo chown -R (username) *. By replacing "(username)" with your logon name, you can get access to the folders and sub-folders. The "supertux-editor" folder contains all the items needed for the editor and you will now be able to save items in its subfolders. The "supertux2" folder is where you can save your created levels and be able to use images, music, etc. from the game for your new levels.Once installed, start "SuperTux – Level Editor". A screen similar to Figure 1 should appear.

Figure 1 When first starting the Editor, go to "Edit" and then select "Preferences". On the new window, select the location of the SuperTux Executable. The usual path is "/usr/games/supertux2". On the "Personal" tab, fill in "Your Name" and "Contact Data". The "Preferred License" can be filled in with "GPL 2+ / CC-by-sa 3.0".
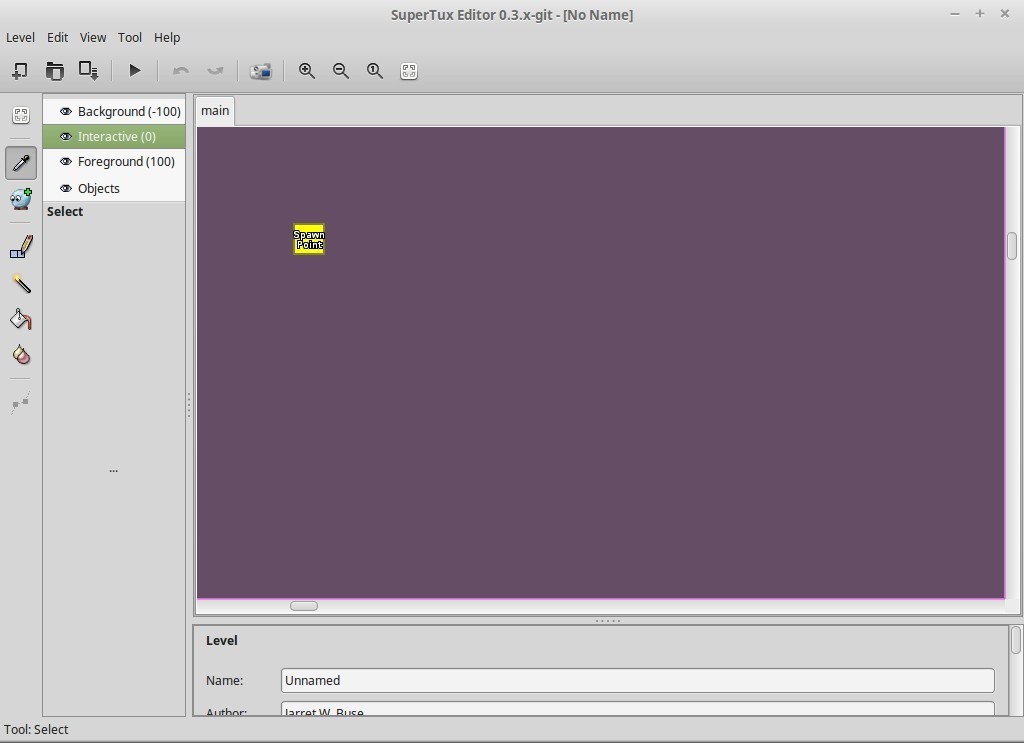
Now, to begin a new level. Select "Level" from the menu and then click on "New". You should now have a blank level ready to be created as shown in Figure 2.

Figure 2 You can look at existing levels which are located at /usr/share/games/supertux2/levels/world1. The level names are shown at the beginning of each level as shown in Figure 3. Here, the level would be "02 - The Journey Begins.stl". The level can be opened in the Level Editor and you can look over or even change the level.

Figure 3 NOTE: I suggest not to make changes in this level, but create your own. Use the existing ones as a template to what you create.
With a new level, there are various sections of the window which should be understood before continuing. Looking at Figure 4, you can see eight icons along the left side of the window. These icons are the tools which provide the following:
- Zoom Tool – allows you to zoom in on a chosen area
- Select Tool – used to select objects on the screen to see their properties
- Objects Tool – used to select and place an object onto the map
- Tiles Tool – used to select and place tiles on the map
- Brush Tool – used to load/save brushes to be used on the map
- Fill Tool – used to fill the map with a select tile
- Replace Tool – used to replace one tile with another on the whole map
- Path Tool – used to select a movable platform and draw the path it takes
From the description of the tools, we have two items which should be defined. Objects are items placed on the map such as bad guys, invisible walls, spawn point, etc. Tiles are basically used as visual blocks to build the scenery and the solid items which Tux interacts. Tiles can be placed in three main areas:
- Background – tiles which appear behind objects and tiles in the Interactive and Foreground state. There is no interaction with Tux or bad guys in the Interactive section
- Interactive – tiles and objects which affect Tux. Objects to walk on and hit when jumping
- Foreground – Items in front of Tux and the background, but does not affect objects in the Interactive or Background sections
The first thing to do after you've created a new level, is to set the properties for the level itself. By default, the level name is "main". The level is shown in the top-right box. The tab at the top of the box says "main". Right-click on the tab and select "Properties". A section under the level, bottom-right, shows the properties of the main section. Under the properties, the level name can be changed from "main". Music can also be selected from the folder "/usr/share/games/supertux2/music", but the listing will show "music/song_name". The Gravity setting should be 10. Setting Gravity to less than 10 will allow Tux to jump farther. And of course, a Gravity setting higher than 10 will cause Tux to not jump as high.
NOTE: Be aware that personal music used should be converted to OGG format and placed into the music folder. Be sure to create a music file with the same name as the OGG file. Point the level music properties to the ".music" file. The basic layout for the file is:
(supertux-music
(file "file_name.ogg")
(loop-begin 0)
(loop-at -1)
)
Replace the file name as needed. The loop-begin is the point at which the music starts playing in number of seconds. The loop-at value is the number of seconds at which the music track starts over. Setting the value at -1 causes the whole track to be played to the end.
You can also right-click the "main" tab and select "resize" to change the size of your level.
Start by placing the tiles for the background. Once done with the background, set the tiles and objects on the Interactive layer. Finally, place tiles in the foreground.
NOTE: This is done by selecting the area in the top-left box next to the tool icons. Be aware which is selected before you start placing tiles and objects.
Hopefully, this helps you get started in creating levels of your own.
Further Reading
- Supertux Level Editor Articles (List) - https://dcjtech.info/topic/gaming/#supertux
- Level Editor (Overview) - https://dcjtech.info/topic/supertux2-level-editor-overview/
- Level Editor (World Maps) - https://dcjtech.info/topic/supertux2-level-editor-world-maps/
- Level Editor (Levels) - https://dcjtech.info/topic/supertux2-level-editor-levels/
- Level Editor (A World with Levels) - https://dcjtech.info/topic/supertux2-level-editor-a-world-with-levels/
- Level Editor (Creating Contrib Levels) - https://dcjtech.info/topic/supertux2-level-editor-creating-contrib-levels/
- Level Editor (Bad Guys) - https://dcjtech.info/topic/supertux2-level-editor-bad-guys/
- Level Editor (Other Objects) - https://dcjtech.info/topic/supertux2-level-editor-other-objects/
- Level Editor (Sequence Trigger) - https://dcjtech.info/topic/supertux2-level-editor-sequence-trigger/
- Level Editor (Movement) - https://dcjtech.info/topic/supertux2-level-editor-movement/
- Level Editor (Yeti) - https://dcjtech.info/topic/supertux2-level-editor-yeti/
- Level Editor (Ghost Tree) - https://dcjtech.info/topic/supertux2-level-editor-ghost-tree/
- Level Editor (InitScript and Sectors) - https://dcjtech.info/topic/supertux2-level-editor-initscript-and-sectors/
- Level Editor (Climbing) - https://dcjtech.info/topic/supertux2-level-editor-climbing/
- Level Editor (Global and Local Variables) - https://dcjtech.info/topic/supertux2-level-editor-global-and-local-variables/
- Level Editor (Candle Object) - https://dcjtech.info/topic/supertux2-level-editor-candle-object/
Attachments:
You must be logged in to view attached files.- AuthorPosts


