
This topic was published by Jarret Buse and viewed 2458 times since "". The last page revision was "".
- AuthorPosts
If you have read Part 1 and 2 of this series, you should have a basic understanding of the Level Editor's use and creating world maps. In this article, I hope to go a little deeper into the creation of a level.
The main thing to keep in mind is the use of the blocks fill the screen. Let's say you have a lower portion of your level which consists of a cave. When the player starts, you do not wish for them to be able to see the lower cavern region. If they do, they will know this is where they are destined to get to while playing.
Let's look at the number of blocks which are visible on the screen at each screen resolution setting:
- 640x480 – 20x15 blocks
- 800x600 – 25x18.75 blocks
- 848x480 – 26.5x15 blocks
- 1024x768 – 32x24 blocks
Looking at the screen resolutions, you can see that in the of 800x600 and 848x480 partial blocks go off the screen. At a maximum, you need to assume that all screen resolutions will be 1024x768. Always use a height of 24 blocks to hide lower levels.
NOTE: Be aware that once Tux hits the bottom of the level (the purple line on the Level Editor), he dies. The purple lines at the sides an top to not affect him other than he cannot pass farther than the two sides.
If your monitor will handle the resolution, start testing the levels using the highest resolution of 1024x768. If you want, you can test the levels at the other resolutions as well to make sure they can be viewed appropriately.
Make sure you select Properties form the Level menu and give your level a name which appears when the level begins. The TargetTime is a value in seconds which the player attempts to beat. The TilesetFile is where the tiles are stored which are used to create the level. The tile sets include:
- tiles.strf – general default tile set
- worldmap.strf – used to create world maps
- ice_world.strf – various tile sets of caverns, castles and ice
NOTE: If you change the TilesetFile, you need to save your world, exit and reload it.
The default tile set if tiles.strf used to make levels.
Now, when creating a level, the level should reflect the area to which the level was entered from the World Map. If, on the world map, the "dot" was in a snow area, the level should also be a snow area. If the area is wooded, then the level could be a jungle. If the level was entered through a castle, then the level should be a castle or dungeon.
Perform the same function as making a World Map, but a Level will be more detailed, close and personal.
Remember that you should start with the Background, then the Interactive layer and finally the Foreground.
The Foreground can be used to hide things in the Interactive Layer. Items in the Interactive Layer can be placed in the Background to fool the player, such as coin blocks and the like.
So, if we should create a level of snow to match our World Map, "The New Land", we should start. Open Level Editor and select Level → New. A new black world should open up. In the properties pane (bottom right), set the name to "Snow Field". The name is the title shown at the beginning of the Level. Fill in the other information as needed and leave the TilesetFile as "images/tiles.strf".
Next, right-click on the "main" tab and select "Properties". Fill in the information as needed. For the music, select "voc-daytime.music".
Create a Level and use the block in the Tile Tools labeled "Final Goal" to mark where the level ends when Tux hits that point. You may want to place a whole column to make sure Tux does not jump over it. The goal is not visible while playing.
I have a sample level as shown in Figure 1.
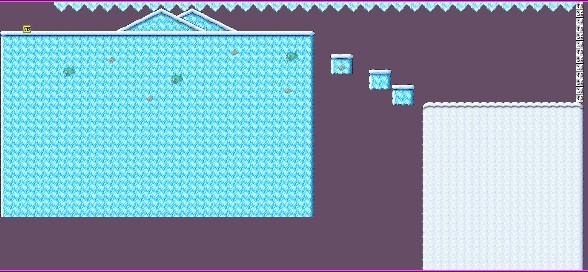

Figure 1 Save the level to the folder "New Land" which was created in the second article about World Maps. The file type is "Supertux Level" with an extension of ".stl".
Make another level or two and we can add them to the World Map in the next article.
Further Reading
- Supertux Level Editor Articles (List) - https://dcjtech.info/topic/gaming
- AuthorPosts