
Homepage › Forums › Articles › Operating Systems › Unixoid Systems in General › Using ANSI Codes in a POSIX Terminal
This topic was published by DevynCJohnson and viewed 3601 times since "". The last page revision was "".
- AuthorPosts
ANSI codes are embedded byte commands that are read by command-lines to output the text with special formatting or perform some task on the terminal output. The ANSI codes (or escape sequences) may appear as character codes rather than formatting codes. Terminals and terminal-emulators (such as Xterm) support many ANSI codes as well as some vendor-specific codes. Learning about ANSI may help terminal users to understand how it all works and allow developers to make better programs.
Control Characters (C0 and C1 Control Codes) are not the same as ANSI codes. Control characters are the commonly used CTRL+button combinations used in a terminal such as [kbd]CTRL[/kbd]+[kbd]C[/kbd], [kbd]CTRL[/kbd]+[kbd]Z[/kbd], [kbd]CTRL[/kbd]+[kbd]D[/kbd], etc. In terminals, control characters may appear as "^C" (for "CTRL+C") in the terminal output. For instance, in a terminal, press [kbd]CTRL[/kbd]+C and then users will see "^C" in the terminal. The [kbd]CTRL[/kbd] button provides a way to input the ESC character.
NOTE: The "ESC character" is not the same as the " [kbd]ESC[/kbd] key".
ANSI codes begin with the ESC character which appears as a carat (^) in terminals. The ESC character is then followed by ASCII characters which specifically tell the terminal what to do or how to display text. The ASCII character after the ESC character may be in the ASCII range "@" to "_" (64-95 ASCII decimal). However, more possibilities are available when using the two-character escape such as the carat and bracket (^[) which is known as the Control Sequence Introducer (CSI). CSI codes use "@" to "~" (64-126 ASCII decimal) after the escape. In ASCII hexadecimal, the ESC character is 0x1B or 33 in octal.
NOTE: The carat character is not the ESC character. Terminals use the carat symbol to display or represent the ESC character.
In a terminal, to type the CSI, type "\e[". The "\e" acts as the ESC character and the "[" is the rest of the CSI. After typing the CSI, type the ASCII sequence needed to generate the desired output. For instance, in Xterm, typing "echo -e \\e[S" will scroll the screen/output up one line. To scroll up more lines, place a number before the "S" which will act as a parameter -
echo -e \\e[5S.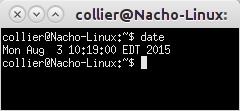
 Xterm (date command)
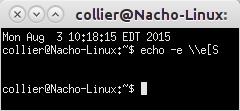 Xterm (ANSI Scroll)
As another example, type
echo -e "This is a \e[Btest.".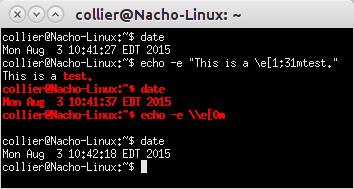
 Xterm (ANSI Styling)
NOTE: When using "printf" instead of "echo", use "\x1b" rather than "\e".
The text can be colorized and formatted. The text color, background, and formatting (i.e. bold, italic, etc.) can be set. The syntax for coloring and styling is "\e[ATTR;ATTR;ATTRm" where "ATTR" is an attribute (i.e. bold, text color, etc.). The trailing "m" indicates that the ANSI code is for text coloring and styling. One attribute can be set or many attributes separated by a semicolon.
When applying styling to text, the style will be used for all text after the ANSI code. Be sure to have "\e[0m" after the end of the intended styling. Executing
echo -e \e[0mwill reset the styling.NOTE: Not all terminals and terminal emulators will support the below ANSI commands.
Select Graphic Rendition (SGR) Parameters
- 0 - Reset (normal attributes)
- 1 - Bold or increased intensity
- 2 - Faint (opposite of bold)
- 3 - Italic
- 4 - Underline
- 5 - Blink slowly
- 6 - Blink quickly
- 7 - Swap foreground and background
- 8 - Conceal
- 9 - Cross-out
- 10 - Default font
- 11-19 - Alternate fonts
- 20 - Fraktur font
- 21 - Bold off or double underline
- 22 - Bold and faint off
- 23 - Italic and fraktur off
- 24 - Underline off
- 25 - Blink off
- 27 - Undo foreground and background swapping
- 28 - Conceal off
- 29 - Cross-out off
- 39 - Default text color
- 49 - Default background color
- 51 - Framed
- 52 - Encircled
- 53 - Overlined
- 54 - Frame and encircle off
- 55 - Overline off
Text Colors
black='\e[30m'

blue='\e[34m'

cyan='\e[36m'

grey='\e[30;1m'

green='\e[32m'

magenta='\e[35m'

red='\e[31m'

white='\e[37m'

yellow='\e[33m'

RGB='\e[38;2;0;0;0m' #0;0;0=R;G;B

Index='\e[38;5;0m'
Background Colors
black='\e[40m'

blue='\e[44m'

cyan='\e[46m'

grey='\e[40;1m'

green='\e[42m'

magenta='\e[45m'

red='\e[41m'

white='\e[47m'

yellow='\e[43m'

RGB='\e[48;2;0;0;0m' #0;0;0=R;G;B

Index='\e[48;5;0m'
Examples
echo -e "This is a test. \e[1;34m`date`\e[0m \nThis is the normal style."

yellow='\e[33m'

normal='\e[0m'

echo -e "This is a$yellow test.$normal"

echo -e "This is a $yellow\e[3;4mtest$normal."
Further Reading
- General Unixoid Topics (Reading Guide) - https://dcjtech.info/topic/general-unixoid-topics/
- Linux Scripting/Command-line (Reading Guide) - https://dcjtech.info/topic/linux-scriptingcommand-line/
- Xterm and rtfm Escape Sequences - http://rtfm.etla.org/xterm/ctlseq.html
- Xterm Control Sequences - http://invisible-island.net/xterm/ctlseqs/ctlseqs.html
- Console Codes - http://man7.org/linux/man-pages/man4/console_codes.4.html
- Summary of ANSI Standards - http://www.real-world-systems.com/docs/ANSIcode.html
Attachments:
You must be logged in to view attached files.- AuthorPosts