This topic was published by Test Dummy and viewed 2647 times since "". The last page revision was "".
- AuthorPosts
The original article was written by William Phan at Gumstix.com (https://www.gumstix.com/category/tutorial/irobot-create-2/?utm_source=DCJTech&utm_medium=Tutorial&utm_campaign=Robotics Tutorials).
Hardware Overview
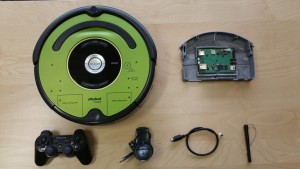
To build your own tele-operated iRobot Create2 you will need the following hardware:
Using a Gumstix COM (Overo or DuoVero):
- A Gumstix COM (to try it at home, we recommend an Overo AirSTORM-Y or the DuoVero Zephyr)
- A matching expansion board with a USB port (i.e. Tobi, Parlor, or AeroCore)
- U.Fl Antenna
- A hi-speed USB hub
- A USB webcam
- Four AA batteries in series to power the COM
- (Optional) Sony Dual Shock 3 controller
Using a Pepper SBC:
- A Pepper 43R or 43C
- U.Fl Antenna
- Gumstix iRobot Create 2 cable (note: the cable will also work with an AeroCore 2 + Overo/DuoVero)
- USB Webcam
- (Optional) Sony Dual Shock 3 controller
You can download the source files for this project from https://d3iwea566ns1n1.cloudfront.net/tutorials/gumstix_create2_source.tar.gz.
Hardware Setup with a Pepper SBC (43R or 43C)
Using a Pepper SBC dramatically reduces the number of parts used, using the Gumstix iRobot Create 2 cable further reduces the bundle of wires. The 3D printed bin is available with the source files here. STL’s for the complete bin as well as a 6-piece variant is available for those with smaller printers.
 Pepper-SBC-(iRobot)
Remove Unused Components
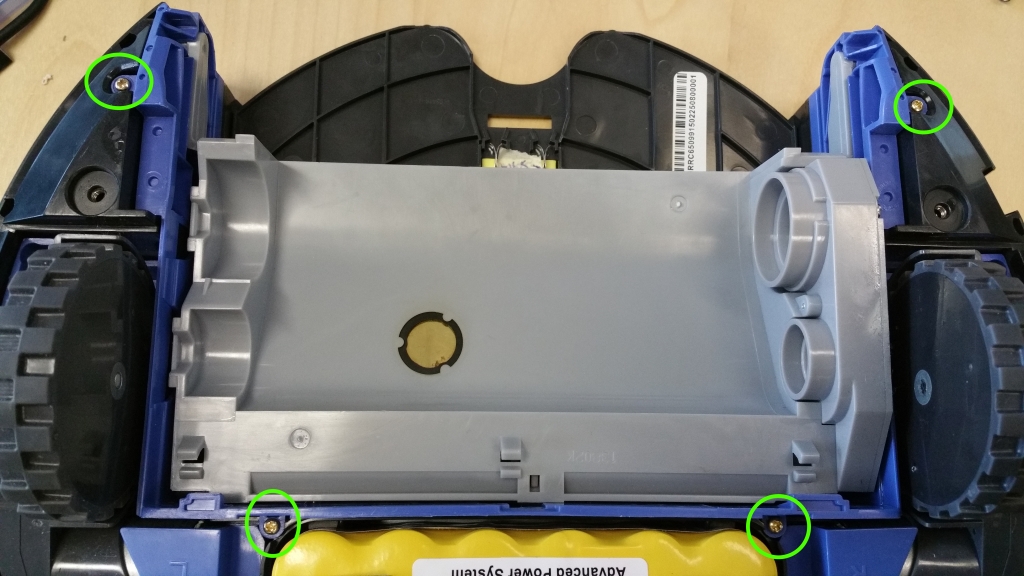
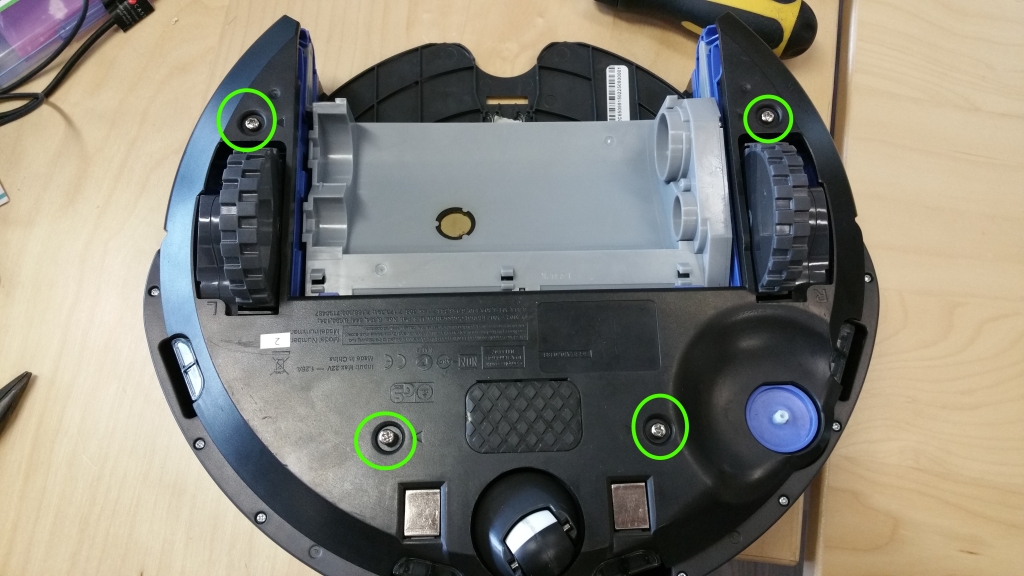
First remove the green faceplate to gain access to the mini-DIN connector. You may use a 1/4″(14mm) drill bit to clear a hole for the connector. Next loosen the 4 screws to the battery cover:
 Underside-of-SBC
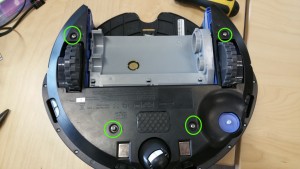
After removing the battery cover, loosen 4 more screws to remove the brush holder:
 SBC-Brush-Holder
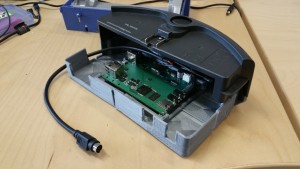
Now, you will have room to put your 3D printed bin! Screw the Pepper onto the 3D printed bin, attach the USB webcam to the USB port, and the Gumstix Create 2 Cable as shown:

 SBC-Jumper-Cable
Connect the JST-XH 2S connector to the matching connector on the Pepper, and the UART connector to pin 98 (brown) and 97 (orange), this is UART2 on the Pepper.
Next, replace the clear bottom piece of the stock dust bin with your new 3D printed bin.
 SBC-Bin-Replacement
Finally, connect the WiFi antennae and feed the USB webcam cable and mini-DIN cable through where the plastic grille used to be:
 SBC-Front-Grille
And you're done, move onto section "Creating a Catkin Workspace".
Hardware Setup with a Gumstix Expansion Board + COM
Remove Unused Components
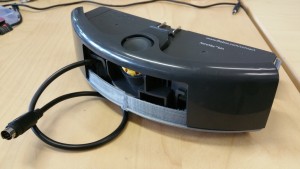
Remove the filter, cover, fan shroud and motor from the bin on the Create 2 to make room for the electronics.
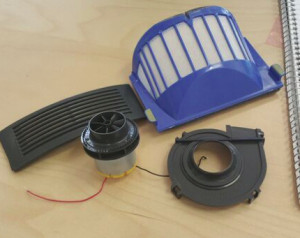
 Removed-Parts
Wire the Batteries and Add a Power Connector
Wire four AA batteries in series to power the COM and electronics. You can also solder a switch on the positive wire to make it easier to cut power to the electronics.
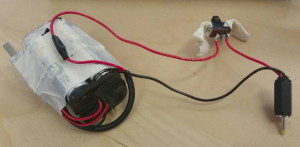
 Batteries-and-Power-Connector
Connect the Hardware
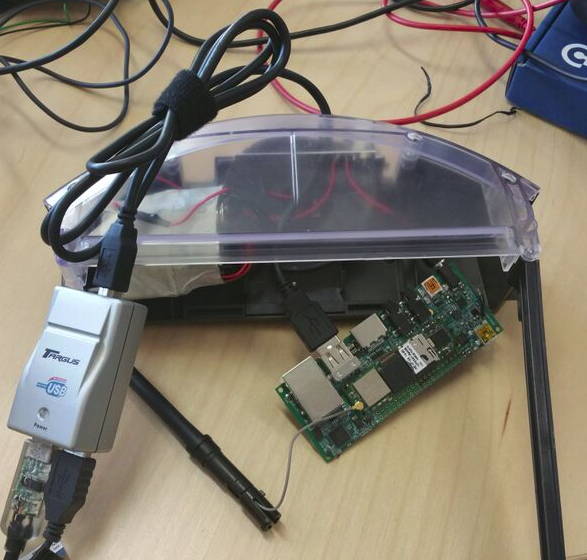
Connect the wireless antenna to the COM, and then connect the COM to the expansion board. Plug the USB port into the Tobi's USB Host port before connecting the batteries to the Tobi's power connector.

 Hardware-Connections
Mount the Hardware Inside the Bay
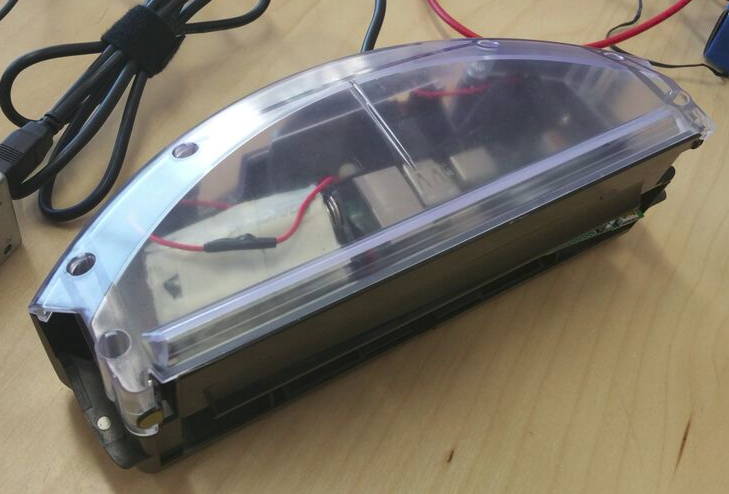
Removing the cover from the bay reveals an opening where you can feed the antenna and USB hub's cable through, as well as a place to mount the power supply switch if you added one in step 2. The Tobi, COM and batteries can all go inside the bay.

 Bay-Opening
Mount Additional Hardware on Top of the Create 2
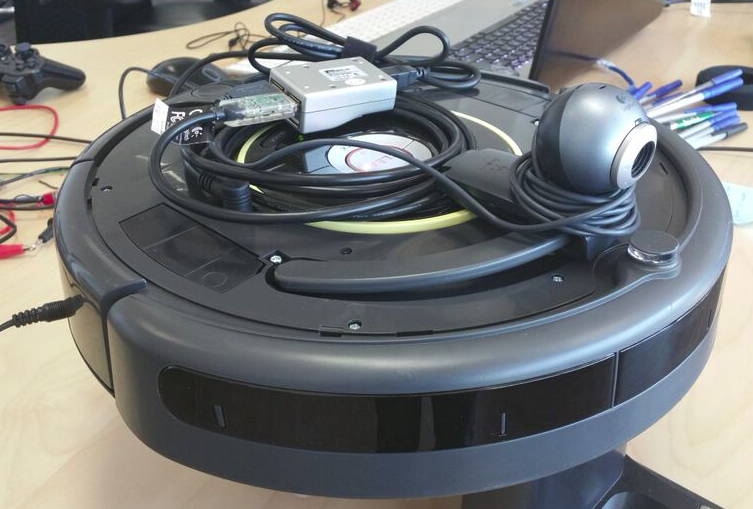
Insert the bay back into the Create 2, find somewhere to secure your webcam and you're set! Make sure your Create 2 is fully charged before tele-operation.
 Completed-Gumstix-Robot
Create a Catkin Workspace
First, install Catkin for your version of ROS:
For ROS Jade:
$ sudo apt-get update

$ sudo apt-get install ros-jade-catkin
Create and initialize a Catkin workspace on your host machine if you don't already have one. There is an excellent set of tutorials on how to do this at http://wiki.ros.org/catkin/Tutorials/create_a_workspace.
Installing ROS Packages on Host
One of the main advantages of ROS is the large collection of open-source packages written and maintained by its community. Learning to install and use these packages can speed up development of your robot considerably.
Installing gscam from Source
First, install some prerequisites:
sudo apt-get install libgstreamer0.10-dev ros-jade-camera-calibration-parsers ros-jade-camera-info-manager libusb-dev libspnav-dev
We will build and install the gscam package from source, as it will be needed later on for streaming video from a USB webcam.
Note: I am running ROS Indigo on my Linux host machine, and my catkin workspace path is ~/catkin_ws. You can create this directory using $ mkdir ~/catkin_ws
Source the following environmental variables:
source /opt/ros/indigo/setup.bash

source ~/catkin_ws/devel/setup.bash
cd to your catkin workspace source directory (
cd ~/catkin_ws/src).git clone the source files -
git clone https://github.com/ros-drivers/gscam.gitcd to the top of your catkin workspace and build the package:
cd ~/catkin_ws

catkin_make
Note: catkin_make builds every package under the src directory in the catkin workspace
Installing Joystick Driver
If you are using ROS indigo, you can install the joystick drivers using apt -
sudo apt-get install ros-indigo-joystick-driversNext we will download and install the joystick drivers. Clone the source files from GitHub:
git clone https://github.com/ros-drivers/joystick_drivers.git

cd joystick_drivers
We will need the file ps3joy.py later in the tutorial.
Create and Initialize a Catkin Package
First we'll need to create and initialize a catkin package to put our source files in. There are some great tutorials on ros.org that cover both creating and building packages.
Source the environmental variables if this is a new terminal session and go to workspace:
source /opt/ros/indigo/setup.bash

cd ~/catkin_ws/src
Create the catkin package -
catkin_create_pkg irobotcreate2cd to the top of your catkin workspace and build the package initially (this will be how we build the package after making any changes):
cd ~/catkin_ws

catkin_make
Make sure the package was built properly and check for build, devel, and src directories:
ls ~/catkin_ws/src/irobotcreate2

build

devel

src
The irobotcreate2 Package
Type or copy the source files (http://media.gumstix.com/tutorials/irobotcreate2_0.0.1.tar.gz) to the catkin package you just created in ~/catkin_ws/src/irobotcreate2
Alternatively, you can clone the source directory to ~/catkin_ws/src/.
An overview tree view of the irobotcreate2 package is as follows:
user@host_machine:~/catkin_ws/src/irobotcreate2$ tree

├── CMakeLists.txt

├── launch

│ ├── host_teleop.launch

│ ├── target_create2.launch

│ ├── unified_launch_kb.launch

│ └── unified_launch_ps3.launch

├── msg

│ └── instructions.msg

├── package.xml

├── scripts

│ └── target_create2.py

| └── host_keyboard_teleop.py

├── setup.py

└── src

├── create2_teleop.cpp

└── irobotcreate2

├── Create2Class.py

├── Create2Class.pyc

└── __init__.py
The package as it stands has four launch files, which take care of launching the individual nodes. The one exception is the ps3joy.py node which must be rosrun'd manually as it requires root permissions to access the Bluetooth drivers on your host machine (more on this later). Host_teleop.launch runs on the host machine; it launches create2_teleop_node (which was created by catkin_make), the necessary joystick nodes, as well as the image_view node to receive the webcam footage from an image pipeline. Target_create2.launch runs on the target COM and launches the target_create2.py which subscribes to instructions.msg and imports the module Create2Class.py to control the Create2.
The unified_*.launch files wrap up the individual launch files and allow you to launch both the Host and Target nodes from a single launch file on the Host. Unified_launch_kb.launch launches keyboard teleoperation, and unified_launch_ps3.launch launches the nodes for joystick teleoperation, but ps3joy.py must be rosrun'd manually for the same reasons mentioned above.
The DualShock 3 controller connects to the host machine over Bluetooth where the ps3joy package reads its button values and publishes button states and values. Create2_teleop_node then reads these values, extracts the necessary information, and republishes this new information as the instructions.msg data structure (this may seem redundant, and it is: the purpose of this exercise was to demonstrate the language independence of .msg files in ROS).
CMakeLists.txt
CMakeLists.txt provides CMake (which is called by catkin_make), the necessary build instructions, as well as target install directories. More info at http://wiki.ros.org/catkin/CmakeLists.txt.
It is necessary to edit the CMakeLists.txt of the package you are building whenever you add a new file, or include a new dependency. Message, service, launch and bag files must also be included in CMakeLists.txt or they will be omitted when catkin_make is called. Special attention must be paid towards your Python and C++ (or other language) source files.
package.xml
Package.xml provides catkin_make with metadata for your package. A thorough line by line analysis and tutorial on package.xml is available on the ROS tutorials page (http://wiki.ros.org/ROS/Tutorials/CreatingPackage#ROS.2BAC8-Tutorials.2BAC8-catkin.2BAC8-CreatingPackage.Customizing_Your_Package).
CMakeLists.txt and package.xml are the key elements of a catkin package and are somewhat intertwined, any discrepancies will show up as an error when you run catkin_make, so make sure to watch the output when running catkin_make!
instructions.msg
.msg files in ROS (http://wiki.ros.org/msg) are language independent (notice we have a C++ publisher and a Python subscriber to this message type) text files that describe the structure of a message used for communication between two nodes on a ROS network. The message file instructions.msg is an extremely simple message file used to transport the values of the two sticks on the Dual Shock 3 controller. This can be easily expanded to include more button states and values from the Dual Shock 3.
More details on the ps3joy package used in this ps3joy tutorial (http://wiki.ros.org/ps3joy).
./scripts/target_create2.py
target_create2.py is the Python node that runs on the Gumstix COM on the Create2. ROS convention calls for all Python nodes to live under a ./scripts directory, separate from the Python modules which live under the ./src directory.
target_create2.py subscribes to the "instructions" topic in this tutorial. It drives the Create 2's left and right wheels with respect to the values read from the "instructions" topic.
Note: You may need to modify the first line under the main section of the code to match the path pointing to your Create 2:
create2 = Create2Class.Create2Class("/dev/ttyUSB0")./src/create2_teleop.cpp
create2_teleop.cpp is the C++ node that runs on the host machine. This node subscribes to the "joy" topic, which contains information regarding the current button state/values on the Dual Shock 3. The node sifts through this information and republishes the desired information over the network under the "instructions" topic.
Note: You may be interested in adding additional functionality by reading more button presses, or even sending commands back to the joystick (blink LEDs or vibrate). Consult the ps3joy package documentation mentioned in the previous tutorial, and modify both create2_teleop.cpp and target_create2.py to implement these new features.
setup.py, ./src/irobotcreate2/Create2Class.py and __init__.py
Create2Class.py is a standalone Python driver for the iRobot Create 2. This driver can in fact be run on its own outside of ROS. The driver wraps the serial commands necessary to access the various features made available on the Create 2. It may be worth your while to skim through this driver and play around with the features available on the Create 2. The ROS package as it is now does not fully demonstrate the capabilities of the Create 2 or Create2Class.py module
__init__.py is the file that lets the system know that there is a Python module living in this directory.
Setup.py is a necessary for letting the system know that the ROS package contains modules and scripts to install.
More information is available at the iRobot Create 2 Open Interface Manual (http://www.irobot.com/~/media/MainSite/PDFs/About/STEM/Create/create_2_Open_Interface_Spec.pdf?la=en).
*.launch
The launch files streamline the node startup process by . Each launch file is as its name implies, host_teleop.launch is launched on the host, and target_create2.launch is launched on the target. Launch files are XML files that launch several nodes, or other launch files simultaneously.
The two unified launch files can be run instead of the two individual launch files mentioned above. These unified versions take care of launching both local and remote nodes together. The exception being when the launch sequence is important. In our case, the ps3joy.py node must be run first in its own terminal session. Only after that can unified_launch_ps3.launch be ran without errors. The unified_launch_kb.launch can be ran by itself on the host because it utilizes the keyboard for teleoperation instead of a Dual Shock 3 controller. Make sure the IP addresses in these files are changed to match your devices' IP addresses.
More information on .launch files at http://wiki.ros.org/roslaunch/XML.
Next, we'll create our very own Yocto Project image to deploy on the Gumstix COM.
Problems with the gscam Package on meta-ros
meta-ros is an OpenEmbedded Linux layer that provides a stable cross-compilation build system for many popular ROS packages. We will be baking this layer into our Yocto Project build later, but you may first be interested in some problems encountered while trying to get a live video feed from a webcam attached to a target system. See this discussion on the meta-ros mailing list for details (https://groups.google.com/forum/#!topic/meta-ros/x_RX0Do85E8).
The mentioned fixes have been implemented and will be pointed out later when we write the bitbake recipe.
Preparing the Yocto Build Environment (on Host)
We will be running an image built with the Yocto Project on our target COM. Please follow steps 1-4 in https://github.com/gumstix/yocto-manifest (an excellent tutorial written by Adam Lee) for setting up the Yocto Project build environment.
Once you've reached step 5, "Build an image," return here as we will need to make some modifications to install the necessary packages before building the image. Be sure to pick the dev branch when initializing the repo client.
Preparing the Bitbake Recipes
You may find the Yocto Project BitBake Recipe Manual (http://www.yoctoproject.org/docs/1.6/dev-manual/dev-manual.html#new-recipe-writing-a-new-recipe) helpful for this section.
A bitbake recipe tells the build system where to get the source files from a particular package from, where to build the package, patch files to apply if there are any, and if there are any build or runtime dependencies.
Writing a Bitbake Recipe
First we will create a bibake recipe for the irobotcreate2 package mentioned above that you either cloned or created. We will be placing this under the meta-gumstix-extras layer.
Move to the meta-gumstix-extras layer and create the bitbake recipe:
cd …/yocto/poky/meta-gumstix-extras/recipes-ros

sudo mkdir irobotcreate2 && cd irobotcreate2

sudo touch irobotcreate2_0.0.1.bb
Open up irobotcreate2_0.0.1.bb in your favourite text editor and paste in the following:
DESCRIPTION = "iRobot Create2 Driver Package"

SECTION = "devel"

LICENSE = "BSD"

LIC_FILES_CHKSUM = "file://package.xml;beginline=9;endline=9;md5=8acbd5f3893ce074720cec0584d189fd"


DEPENDS = "rospy roscpp catkin"

RDEPENDS_${PN} = "rospy roscpp python-pyserial gscam"


EXTERNALSRC = "/home/%USERNAME%/catkin_ws/src/irobotcreate2/"

EXTERNALSRC_BUILD = "/home/%USERNAME%/catkin_ws/build/"


S = "${WORKDIR}/${ROS_SP}/${ROS_BPN}"


inherit catkin
You will want to change EXTENRALSRC and EXTERNALSRC_BUILD to reflect your source and build directories.
Modifying a bitbake Recipe
Now, we will edit gumstix-console-image.bb to include the necessary packages.
Navigate to the bitbake recipe in your Yocto build environment -
cd …/yocto/poky/meta-gumstix-extras/recipes-images/gumstixOpen gumstix-console-image.bb with your favourite text editor and make the following additions:
Edit UTILITIES_INSTALL to contain the following packages necessary for meta-ros and our irobotcreate2 package:
UTILITIES_INSTALL = " \

coreutils \

camera-info-manager-py \

diffutils \

findutils \

git \

git-perltools \

gpsd \

grep \

joy \

gzip \

less \

nano \

packagegroup-cli-tools \

packagegroup-cli-tools-debug \

packagegroup-ros-comm \

python-distutils \

python-email \

python-rosinstall \

python-pyserial \

python-wstool \

irobotcreate2 \

sudo \

std-msgs \

message-generation \

message-runtime \

tar \

vim \

wget \

zip \

"
Add the following gscam and gscam dependencies under UTILITIES_INSTALL:
GSCAM_INSTALL = " \

gscam \

nodelet \

cv-bridge \

roscpp \

theora-image-transport \

sensor-msgs \

camera-calibration-parsers \

camera-info-manager \

gst-plugins-good-video4linux2 \

gst-plugins-base-app \

"
Note: If you read the discussion on the meta-ros mailing list about my problems with gscam (linked above), you will notice that I used smart update and smart install gst-plugins-good-video4linux2 to install V4L2 and base-app plugins. This was done on the COM after baking the image. Putting these entries directly in the bitbake recipe will create an image with these packages already installed! This will save us a considerable amount of time since we don't have to wait for smart update to run.
Next we add our new GSCAM_INSTALL under IMAGE_INSTALL to get:
IMAGE_INSTALL += " \

${FIRMWARE_INSTALL} \

${SYSTEM_TOOLS_INSTALL} \

${DEV_TOOLS_INSTALL} \

${NETWORK_TOOLS_INSTALL} \

${MEDIA_TOOLS_INSTALL} \

${GRAPHICS_LIBS} \

${UTILITIES_INSTALL} \

${GSCAM_INSTALL} \

"
Finally lets patch the v4l.launch file in gscam to work with jpeg webcams (there is a chance you don't need to do this).
Change directories to the gscam bitbake recipe under the meta-ros layer -
cd …/yocto/poky/meta-ros/recipes-ros/gscam/gscamMove the provided patch file to this directory:
$ sudo mv …/v4l_jpeg_webcam.patch ./
Next, edit the gscam recipe to include this new patch:
$ vim ../gscam_0.1.3.bb
You only need to add one line to include our new patch:
SRC_URI += "file://0001-gscam_nodelet.h-include-scoped_ptr.hpp-to-compile-wi.patch \

file://v4l_jpeg_webcam.patch"
That's it for preparing recipes, next we'll bake the image and put it on the microSD card for our COM.
Bitbaking the Image
Move to your Yocto Project build environment and initialize the environment:
cd …/yocto

export TEMPLATECONF=meta-gumstix-extras/conf

source poky/oe-init-build-env
Now run bitbake! (make sure you have at least 25GB of free space for this process)
$ bitbake gumstix-console-image
If this is your first time bitbaking, it can take several hours, depending on the speed of your machine and your internet connection.
Lets prepare your microSD card in a separate terminal session while the bitbake process is running, the microSD card should have a capacity of at least 2GB, but the more the merrier.
Unmount your microSD card (replace /dev/sdx with your microSD card's block ID. If your card has several partitions, you must umount each of them individually):
$ umount /dev/sdX
Format your microSD card using the script provided:
cd …/yocto/poky/meta-gumstix-extras/scripts

sudo ./mk2partsd /dev/sdX
Wait for the script to finish running, then remove and reinsert your microSDcard.
Note: If the bitbake process throws a MD5(or SHA256) checksum error, and provides you with a new MD5sum, copy that and update the md5 value in the specified *.bb file.
After the bitbake process has completed, you can load the necessary files on the microSD card:
cd …/yocto/build/tmp/deploy/images/{overo|duovero|pepper}

cp MLO u-boot.img /media/%YOUR_USERNAME%/boot

sudo tar xvaf gumstix-console-image-{overo|duovero|pepper}.tar.bz2 -C /media/%YOUR_USERNAME%/rootfs –strip-components=1

sync

umount /dev/sdX1

umount /dev/sdX2
And we're done!
Connecting to the COM and Enabling WiFi
We will now cover the booting up and connecting to the COM, as well as enabling WiFi on the COM. Carrying on from the previous tutorial, insert the new microSD card into the COM and place the COM on an expansion board with a USB console port.
Connecting to the COM (on Host)
Plug a USB cable between your host machine and the COM and start a screen session on your host machine (replace /dev/ttyUSBn with the path to your COM):
$ screen /dev/ttyUSBn 115200n8
Connect power to the expansion board and watch the boot sequence. If the COM fails to boot, you may want to retry either bitbaking the image and/or extracting the files to the SD card.
When prompt for a login, login as root:
overo login: root

root@overo:~#
Enabling WiFi (on COM)
Make sure you have the proper antenna inserted into the connector on the COM, and edit the following file with your favourite text editor (pick wlan0 if using an Overo, mlan0 if using a Duovero):
# vim /etc/wpa_supplicant/wpa_supplicant-{wlan0|mlan0}.conf
Uncomment the network section and enter your WiFi connection's SSID and PSK. Then enable WiFi and reboot:
systemctl enable wpa_supplicant@{wlan0|mlan0}

sudo reboot
After the reboot, check your connection with ifconfig(your host machine and COM needs to be on the same network for the irobotcreate2 package to work):
# ifconfig

…

wlan0 Link encap:Ethernet HWaddr ab:cd:ef:gh:ij:kl

inet addr:192.168.1.xxx Bcast:192.168.1.mno Mask:255.255.255.0

…
Take note of your inet addr, this is how your host will identify the COM over the network.
Do the same thing on your host machine to get its inet addr, we will have the COM look for your host's inet addr as the ROS master node location:
(on Host):
$ ifconfig

…

wlan0 Link encap:Ethernet HWaddr ab:cd:ef:gh:ij:kl

inet addr:192.168.1.yyy Bcast:192.168.1.mno Mask:255.255.255.0

…
After WiFi is enabled, and your COM is on the same wireless network as your host machine, you can replace the screen session with an SSH session and gain wireless command line access to the COM from your host machine:
$ ssh [email protected]

root@overo:~#
Note: If SSH fails, try replacing "overo.local" with the the COM's inet addr.
Now just add the battery pack and your robot will be wireless!
Running the ROS Nodes
Next we will go over starting the ROS Package using separate launch files, and a unified launch file as well.
(on Host):
Open a new terminal window and start the ROS master node:
Note: Setup.bash must be sourced before using any ROS specific commands, this must be done every time you start a new terminal session. I suggest adding it to the bottom of ~/.bashrc so it runs automatically each time you launch a new terminal session
source /opt/ros/indigo/setup.bash

roscore
Open another terminal window and run the node to connect to your PS3 controller:
Note: This must be done independently as the ps3joy.py node requires root permissions to access the Bluetooth drivers on your machine. Starting the other joystick node via the *.launch files without a PS3 controller connected would also throw errors.
rosrun ps3joy ps3joy.py
Hit the PS button as instructed and wait until Connection activated is printed on the terminal.
Starting with Individual Launch Files
Open a third terminal and launch the remaining nodes on your host machine:
source ~/catkin_ws/devel/setup.bash

roslaunch irobotcreate2 host_teleop.launch
If everything goes well, you should be looking at 3 terminal windows and a small white window.
We need to source the environmental variables for ROS on the COM as well, I like to make a file for this and scp it over to the COM whenever I build a new image:
(on Host):
Create a new file with the following contents (replace 192.168.1.yyy with your HOST's IP address found in the previous tutorial):
#!/bin/bash

export ROS_ROOT=/opt/ros/indigo

export PATH=$PATH:/opt/ros/indigo/bin

export LD_LIBRARY_PATH=/opt/ros/indigo/lib

export PYTHONPATH=/opt/ros/indigo/lib/python2.7/site-packages

export ROS_MASTER_URI=http://192.168.1.yyy:11311

export CMAKE_PREFIX_PATH=/opt/ros/indigo

touch /opt/ros/indigo/.catkin


exec "$@"
Save it as ros_init.sh, then scp it over to the COM:
$ scp ./ros_init.sh [email protected]:/home/root
(on COM):
Initialize the ROS environment and launch the target nodes (note: tab completion on meta-ros doesn't work as well as on desktop ROS):
source ./ros_init.sh

roslaunch irobotcreate2 target_create2.launch
When the COM sends a startup message to the Create 2, it will play a short melody. After you see some information (bootloader version, serial number etc…) about the Create 2 scroll through on the terminal, you should be able to start driving around! Webcam feed should also pop up on the white window that launched on the host earlier.
Starting with a Unified Launch Files
The <machine> tag recognized by roslaunch allows the user to declare multiple machines. The unified_*.launch files make use of this tag to streamline the node launching process into a single launch file. There are two flavours of unified launch files in this package: a keyboard teleop, and a PS3 teleop. The PS3 flavour isn't completely streamlined as you still need to launch the ps3joy.py node first (as instructed above). The keyboard flavour is completely streamlined and will launch both local and remote nodes upon launch. Both files are intended to be run on the host machine:
You must first provide the target with your host's public key for authorization:
(on Host):
$ scp .ssh/id_rsa.pub [email protected]:/home/root/
(on COM):
mkdir ~/.ssh/

touch ~/.ssh/authorized_keys

cat ./id_rsa.pub >> ~/.ssh/authorized_keys
(on Host):
export ROSLAUNCH_SSH_UNKNOWN=1

roslaunch irobotcreate2 unified_launch_kb.launch
Or, to use a PS3 controller:
(On Host, two seperate terminals):
rosrun ps3joy ps3joy.py

export ROSLAUNCH_SSH_UNKNOWN=1

roslaunch irobotcreate2 unified_launch_ps3.launch
Troubleshooting
Create 2 won't charge: The Create 2's battery cannot be charged in Safe or Full mode (the mode it is in when connected to the Python driver). To leave these modes and enter passive mode, connect to the Create 2 and then disconnect with CTRL-C:
(on COM):
$ roslaunch irobotcreate2 target_create2.launch
Or:
(on Target or Host, whichever Create 2 is connected to):
$ rosrun irobotcreate2 target_create2.py
Wait for melody to play, then hit CTRL+C
…

Roomba by iRobot!

…

$ ^C

Ctrl+C detected, closing down gracefully…
The Create 2 should now be in passive mode, and the LED ring around the CLEAN button should pulsate when charger is connected.
Can't connect to Create 2: Double check the path in target_create2.py
No video feed (ERROR: failed to PAUSE stream…):
Double check the path to your webcam /dev/videox and make sure /opt/ros/indigo/share/gscam/v4l.launchreflects that path (on your COM)
You may also need to install the plugins using smart:
(on COM):
smart update

smart install gst-plugins-good-video4linux2

smart install gst-plugins-base-app
In part five of the tutorial, we'll learn about going further with robotics applications.
Replacing WLAN with Access Point Mode on supporting COM's
Several COM's in the Gumstix line up support access point mode. At time of writing, this includes COM's under the Overo line with names ending in ‘Y' or ‘P'. After setting up access point mode on the Overo, the host can connect to this the same way you would connect to any wireless network. Adding this feature makes your Create 2 and laptop teleoperation pair fully wireless without the need for any more external hardware!
First we'll prepare the access point on the Overo:
Open up /etc/hostapd.conf on the Overo:
# vi /etc/hostapd.conf
Edit ssid to be your desired access point name. Uncomment and modify wpa_passphrase if you would like your access point to be password protected.
Enable access point mode and reboot:
systemctl enable hostapd

sudo reboot
After reboot, check that the access point is up and running, also take note of the new address of the Overo!
# ifconfig

ap0 Link encap:Ethernet HWaddr nn:nn:nn:nn:nn:nn

inet addr:192.168.2.xxx Bcast:192.168.2.abc Mask:255.255.255.0

…
The inet addr under ap0 is your Overo's address, this is how the host will identify the Overo on the Overo's network.
Next, connect your host machine to the access point. The network's name will be what you set ssid to earlier.
Now we want to check the address assigned to the host machine:
(on Host):
$ ifconfig

…

wlan0 Link encap:Ethernet HWaddr nn:nn:nn:nn:nn:nn

inet addr:192.168.1.yyy Bcast:192.168.1.abc Mask:255.255.255.0

…
The inet addr field under wlan0 is the address assigned to the host by the Overo.
Now lets add the Overo's address to /etc/hosts on the host machine so we can SSH:
(on Host):
$ sudo vim /etc/hosts
add the Overo's address to /etc/hosts:
192.168.2.xxx overo
Next we move to the Overo and add the host address to its /etc/hosts
(on Overo):
# vi /etc/hosts
add HOSTNAME(name of your host machine) and the overo itself addresses to the file:
192.168.2.yyy HOSTNAME

192.168.2.xxx overo
Finally, modify ros_init.sh to reflect the new host machine address (you can also use HOSTNAME instead of 192.168.2.yyy):
# vi …/ros_init.sh

…

export ROS_MASTER_URI=http://192.168.2.yyy:11311

…
That's it for setup! Next we launch our ROS package on this new network:
(on Host):
export ROSLAUNCH_SSH_UNKNOWN=1

roslaunch irobotcreate2 unified_launch_kb.launch
Note: You can also use unified_launch_ps3.launch as specified in the previous tutorial in this series.
If all goes well, you should be looking at a video stream and a box to enter commands!
Expanding on the irobotcreate2 Package
This tutorial series focused more on ROS package development and deployment than on the individual packages and libraries used. We've only scratched the surface of these packages: their features could be utilized further to create much more impressive projects.
Ps3joy Package
The ps3joy package (http://wiki.ros.org/ps3joy) by Blaise Gassend, Pascale and Melonee Wise was used to connect to a PS3 controller, this driver works with both the Dual Shock 3 and SIXAXIS controllers. This package handles connection with the joystick and modifies the data received so that it looks like a normal joystick in userland.
This package provides access to every feature on the joystick: buttons, sticks, accelerometre, gyroscrope, LED's, and motors. We only made use of the two sticks to drive the Create 2. Create2_teleop.cpp and instructions.msg can be modified to watch more button states/values. After modifying create2_teleop.cpp, you will need to run catkin_make at the root of your catkin workspace to build the new binaries. You can also send information back to the controller to control the LED's and vibration motors.
Create2Class.py Python Class
The Create2Class.py Python class wraps up most of the serial commands available from iRobot's Open Interface [2] in a user friendly, decently documented Python class. Through this Python class, you get access to: both drive wheels, drive encoders, cliff sensors, bump sensors wall sensors, buttons, and also get battery information. You can also make the Create 2 play different tones and display different characters on the 7-segment displays, as well as light up several LED's by consulting http://www.irobot.com/~/media/MainSite/PDFs/About/STEM/Create/iRobot_Roomba_600_Open_Interface_Spec_0512.pdf?la=en, and using the sendASCIICommand() function to easily send serial commands to the Create 2.
Conclusion
Congratulations for sticking with the tutorial to the end! I encourage you to have a look through Create2Class.py as well as the ps3joy ROS package to improve on this package, but for now we have a pretty decent tele-operated robot with a range limited by the wireless network's range.
Hopefully this tutorial has taken some of the guesswork out of getting started with ROS for you. Good luck in your adventures with ROS!
Attachments:
The user "Test Dummy" (@testdummy & 87535) is an account used by the admins to run tests or anonymously post on another's behalf.
- AuthorPosts