
Homepage › Forums › Articles › Operating Systems › Linux › Puppy Linux › Puppy Linux Packages
Tagged: dotpup, file, installation, linux, package, package-management, pup, puppy
This topic was published by DevynCJohnson and viewed 2699 times since "". The last page revision was "".
- AuthorPosts
Puppy Linux and its derivatives use a different package management system than other distros. Although Puppy Linux is not as popular as other branches of GNU/Linux, all hardcore Linux users should know how to use the Puppy's package manager. It is one of the easiest package systems to use (if not the easiest).
NOTE: Puppy Linux also supports SFS packages/files, but that is a whole other topic.
Puppy Linux and its forks use Puppy Package Manager (PPM) which primarily uses PET packages. PET packages are the installation files that have the *.pet file extension. PET stands for "Puppy's Extra Treats" or some people say "Puppy's Enhanced Tarballs". A PET file is just a tarball (.tar.gz) renamed to *.pet and has a md5sum appended to the end of the file (EOF).
NOTE: Just in case I am not clear in what I mean by "installation file", this example may help. In MS-Windows systems, software is installed using a file with the extension "exe" or "msi". Such files are installation files/packages. Ubuntu uses files with the extension "deb". These DEB files are installation files. Such files add more applications, drivers, wallpapers, etc. to the system.
Notice that I said PPM primarily uses PET packages. Puppy Package Manager also supports the following packages - *.deb (Debian), .tgz (Slackware), .pkg.tar.gz (Arch), and DotPet. Puppy Package Manager can also access Ubuntu repositories.
NOTE: A repository (repo) is a collection of software packages on a server.
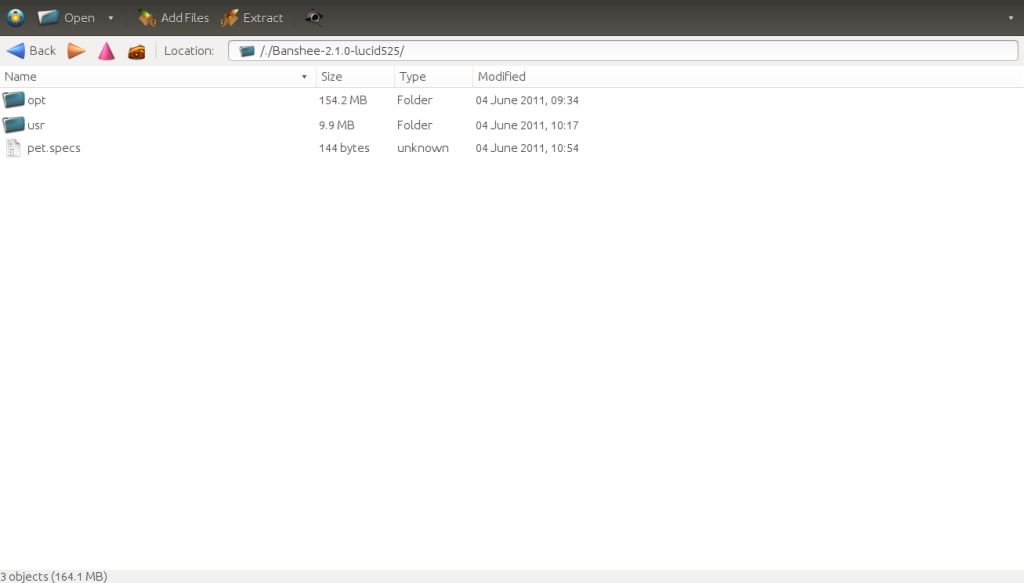
Inside a PET file, there are two scripts, a ".desktop" file, maybe some XPM or PNG files, a folder with the software, and the specs file (pet.spec) in older PETs. Of the two scripts, one is named "pinstall.sh; it executes after installation (post-installation script). The second script, puninstall.sh, executes after the package is uninstalled. The ".desktop" file is used to make the menu entry for the software. For example, on a Puppy system, if a user sees Firefox in the application menu, then they know that Firefox's PET file contained a ".desktop" file. Puppy Linux stores these desktop files in /usr/share/applications/. The icon used in application menus is the XPM or PNG file seen in the PET file. The folders contain the software and the contents are copied to the specified location. For instance, if a directory named "opt" is in the root of the PET file, then the contents of that folder will go in /opt/.

PET_Contents NOTE: By the way, do you ever see those applications in the menu that are using a generic or odd-looking icon? Well, they have that icon because their PET file lacked a XPM or PNG icon, or the icon file was corrupted. The XPM and PNG files go in /usr/local/lib/X11/mini-icons/ and the ones with a number in the name (*48.xpm) belong in /usr/local/lib/X11/pixmaps/.
The specs file is a file titled "pet.spec" and is seen in older PET files. It is a plain-text file that contains general information about the software. Below is an example of the contents. As you can see, the file contains information like the name of the software, size, type of software (multimedia), and other info.
Banshee-2.1.0-lucid525|Banshee|2.1.0-lucid525||Multimedia|161096K|pet-packages-lucid|Banshee-2.1.0-lucid525.pet||Listen to music|ubuntu|lucid||To install a local PET file, click it and PPM will open to allow the user to install the package. To install packages in a repository, open Puppy Package Manager and search for the desired package. The installation is self-explanatory. Just select the desired software and click install. Allow the dependencies to install unless there is some reason not to allow the extra packages to install. When installing local PET packages, make sure that the package is not intended for an older version of Puppy Linux. Mixing versions may cause issues.
To uninstall software, open PPM. Depending on the version used, double-click a package and select uninstall or click the uninstall button which opens a window. In that window, select the software to uninstall. To uninstall packages quickly, use Unpet. Using Unpet is faster than using Puppy Package Manager to uninstall software.
Puppy Linux also supports DotPet files which can be installed using dotpuprox.sh like this - "dotpuprox.sh DOTPUP-FILE"
To make your own DotPet files, you could use PetMaker. PetMaker is a GUI application with a simple layout. To make the PET file, type the desired name for your PET file. Then, in the next two boxes, browse and select the files/directories that need to go in your PET file. Once done, click "Create PET".
Some alternatives to Puppy Package Manger (PPM) exist. QuickPet is a stripped down version of PPM. This means QuickPet is smaller, easier to use (or so says the developers), and more simple. SlickPet is even more lightweight than QuickPet. Another difference between PPM and the two smaller package managers is the amount of available software; PPM offers the most. SlickPet supports PET, tgz (Slackware), and txz (Salix). PPM does not support Salix packages. So, users can have PPM and SlickPet installed on the same system to have access to a greater amount of packages. Having SlickPet and PPM on the same system will not cause conflicts/issues. QuickPet supports PET and SFS files.
Puppy Linux offers some conversion utilities that convert between different package types as seen below.
- dir2pet - convert a directory of files to a PET file.
- new2pet - Place the new2pet command before the needed commands to compile source code (like "new2pet make install"). Doing so gets the newly created files (the final binaries, not the *.o files) and puts them in a PET file. In other words, this is like a source to PET converter. Users could make a shell alias for "new2pet" and name it "src2pet" just for fun (and accuracy).
- new2dir - This is like new2pet, but the files are put in a new directory.
- pet2tgz - This converts PET to Slackware packages.
- tgz2pet - This converts Slackware packages to PET files.
- pup2pet - This command converts DotPup packages to *.pet. Actually, this is embedding the DotPup in the PET file.
To do a real convert from DotPup to PET, try this. DotPup files are installed using "dotpuprox.sh" rather than PPM, and the new2dir and dir2pet (together) converts outputed files to PET. Right? Then, we can use the command
new2dir dotpuprox.sh /PATH/PACKAGE.pup; dir2pet DIR. Now some of you may be thinking "why not use dir2pet instead of using two conversions?". Well, some Puppy Linux users claim the command above is better. You can try using dir2pet if you wish. I just mention new2dir and dir2pet because that is what most user recommend, but do which ever suits your needs.Other conversion utilities include deb2pet, rpm2pet, alien2puppy, and a few others.
Further Reading
- Converting Linux's Installation Packages - https://dcjtech.info/topic/converting-linuxs-installation-packages/
- Debian Package Management Commands - https://dcjtech.info/topic/debian-package-management-commands/
- Package Management Article Index - https://dcjtech.info/topic/package-management/
- AuthorPosts
